Server Configuration
· Joomla version 2.5 or above
If you are using VirtueMart 2.0 or above hosted with Joomla! 2.5 or above, then download the VirtueMart server files from www.atandra.com/downloads/thub_joomla25_virtuemart20_server_files_1_10.zip
· Joomla version 1.5
If you are using VirtueMart with Joomla! 1.5, then download the VirtueMart server files from www.atandra.com/downloads/thub_joomla15_virtuemart_server_files_1_0.zip
1. Installing T-HUB Server component on Joomla
- Login to your Joomla! Administrator panel.
- Click on “Extensions” menu and then click on “Install/Uninstall”
- Click “Browse” and select the zip file downloaded above. Click on the “Upload File & Install” button.
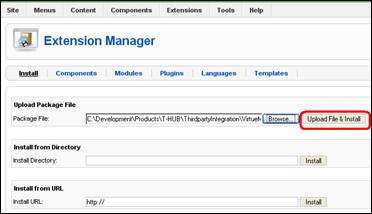
- You should see a successful installation message as below
- Note the url displayed and highlighted in red
- If there is any problem, installing the component on the website using the steps above then follow steps here to install the component manually on your website.
Settings in T-HUB
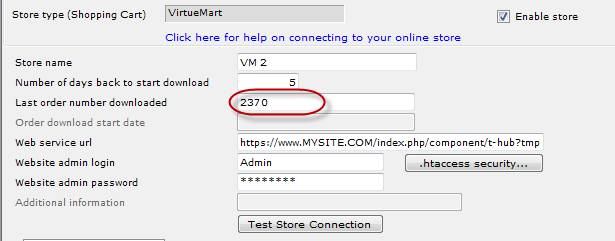
- Open T-HUB
- Click on the “Add Online Store” icon under Online Stores tab.

- Select VirtueMart as Store type (shopping cart) list.
- Enter the Last Order Number downloaded. This is the order number from which T-HUB will start order download.
- Enter your website admin url for Thub script. Note the url is case-sensitive, please verify the url based on the version of Joomla/Virtuemart you are using. This url must start with http:// or https://
a) Example Web service url for Joomla 2.5 or above (with Virtuemart 2.0 or above) is (replace mysite.com with your actual domain name)
http://www.mysite.com/index.php/component/t-hub?tmpl=component&format=xml
or
http://www.mysite.com/index.php?option=com_t-hub&tmpl=component&format=xml
b) Example Web service url for Joomla 1.5 or above is below (replace mysite.com with your actual domain name)
http://www.mysite.com/components/com_t-hub/thubservice.php
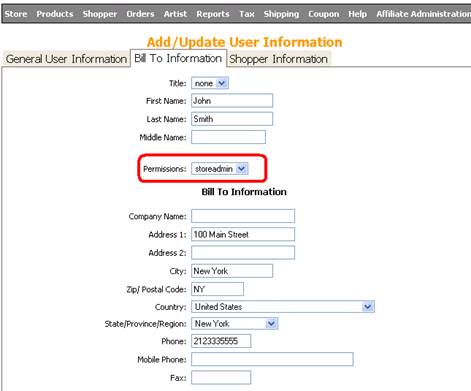
- Enter your website admin account login, password. This is the admin login and password you use to login to the admin site of your website. Note this user should be assigned to the super administrator group on the website.

Also note that the user should have storeadmin permissions defined under
VirtueMart user settings as shown below (Click on Components > Virtuemart
> Users. Click on the user and then click on Shopper information tab).
- If you get a pop-up login when accessing your admin website then you should enter the pop-up login/password under .htaccess security button.
- Click on Test Store Connection. If all the parameters are correct you should see a message like store successfully connected.
- Click Save & Close to close the add online store form.