Connecting T-HUB to Authorize.Net account
- Login as the administrator to your Authorize.Net Account at https://account.authorize.net/
- Click on Account > API Login and Transaction Key to generate your account API Login and Transaction Key. Note down the API Login and Transaction Key carefully [recommend copy and paste to avoid typing mistakes]. Simply follow steps at this link to generate your API Login and Transaction Key to use. https://account.authorize.net/help/Account/Settings/Security_Settings/General_Settings/API_Login_ID_and_Transaction_Key.htm You may also follow this link to watch a video on this topic http://www.authorize.net/resources/videos/API_640x480.html
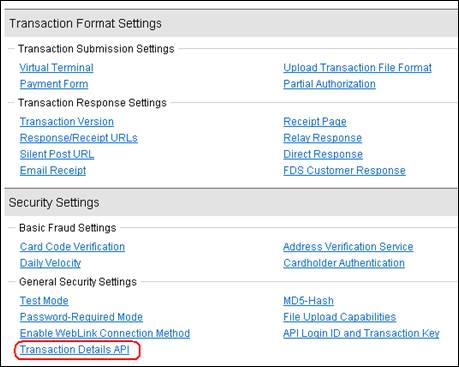
- Click on User Accounts > Transaction Details API
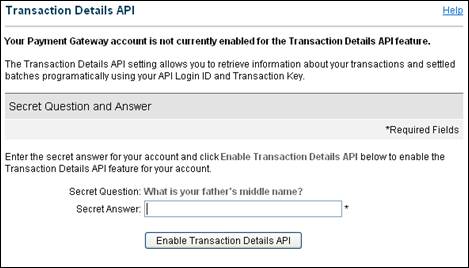
Answer the secret question you have set while creating your account and click on “Enable Transaction Details API” button.
This completes the setup on your Authorize.Net account.
- Open T-HUB application
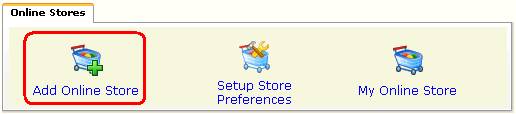
- Click on the “Add Online Store” icon under Online Stores tab.
- Select Authorize.Net as Store type (shopping cart) list.
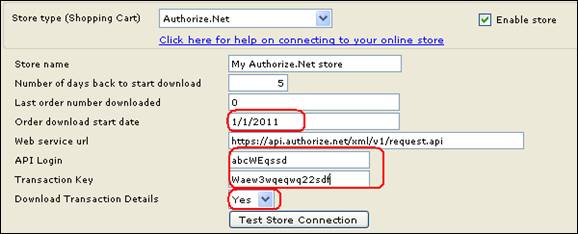
- Enter the date (mm/dd/yyyy format in Order download start date) from which to start transaction download from. Note that this date cannot be more than 2 years in the past. In other words you can download transactions for upto last 2 years.
- Enter the API Login and Transaction Key EXACTLY (CASE SENSITIVE) from step 2 above.
- Download Transaction Details:
- Set this value to Yes if you want to download all individual transactions into QuickBooks. All sales and refunds will be downloaded as individual transactions into T-HUB and QuickBooks. If there are 100 transaction in a day, there will be 100 transactions in QuickBooks.
- Set this value to No, if you want only the daily sales summary to be downloaded into QuickBooks. In this case set the Store Name as the Customer Name you want recorded in QuickBooks. In this example the customer name in QuickBooks will be “My Authorize.Net Store”. Note that sales summary for VISA/Master/Discover transactions will be separated from AmericanExpress. So if there are 100 transactions in a day, this will create two transactions in QuickBooks – One with all VISA/Master/Discover and the other with all Amex transactions.
- DO NOT CHANGE the Web Service Url.
- Click on Test Store Connection. If all the parameters are correct you should see a message like store successfully connected.
- Click Save & Close to close the add online store form.
- Click on Process Orders icon in T-HUB
- Click on the download orders icon highlighted below. This will start the transaction download from your Authorize.Net account. Depending on the start date entered in step 7 and the number of transactions in your account, this process may take a few minutes…
![]()