T-HUB with Amazon seller central
Contents
Generating connection parameters from Amazon
Settings in T-HUB Client Application
Settings for recording Amazon Fee in QuickBooks financial
Generating connection parameters from Amazon
To have T-HUB communicate with your Amazon seller central account, you will need to have a Selling on Amazon Pro Merchant account, an Amazon WebStore account, or an Amazon Product Ads account.
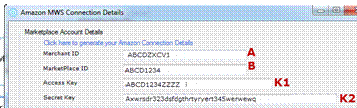
To Connect T-HUB to your amazon seller central account, you need the following five pieces of information from Amazon. Fill up the value column in the table below as you proceed with this configuration.
|
No. |
Tag |
Description |
Reference |
Value (example) |
|
1 |
A |
Merchant ID |
Picture 3 |
ABCDZXCV1 |
|
2 |
B |
Marketplace ID |
Picture 3 |
ABCD1234 |
|
3 |
K1 |
AWS Access Key ID |
Picture 3 |
ABC1234ZZZZ |
|
4 |
K2 |
AWS Secret Access Key |
Picture 3 |
adasdf23123231wqweqweqew |
Table 1
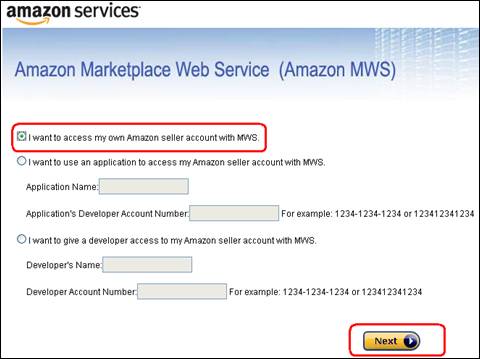
- Step 1 - Register your Amazon Marketplace Web Services (MWS) account to T-HUB:
- Click on this link https://sellercentral.amazon.com/gp/mws/registration/register.html
- Select the first option “I want to access my own Amazon seller account with MWS” and click Next
Picture 1
- Click check box to accept Amazon MWS agreement and click Next

Picture 2
- You will now see screen with Congratulations and this will list the four values you need to note in Table 1 above. Note the values tagged A, B, K1, K2 in table 1 above.
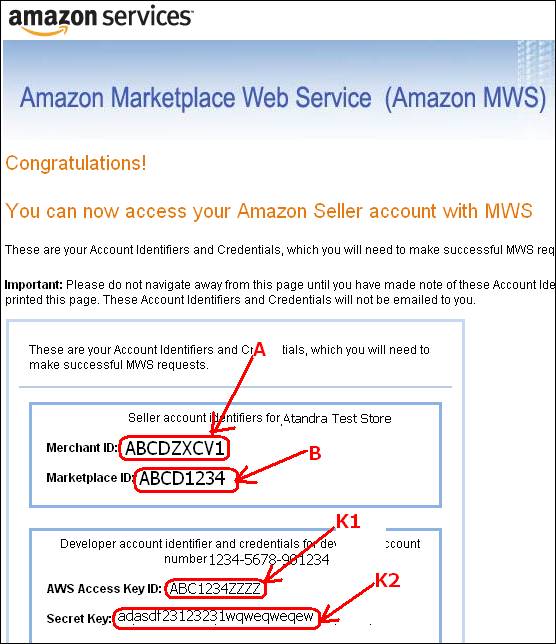
Picture 3
Settings in T-HUB Client Application
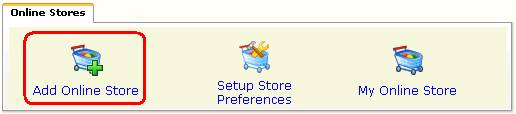
- Open T-HUB client application
- Click on the “Add Online Store” icon under Online Stores tab.
Picture 4
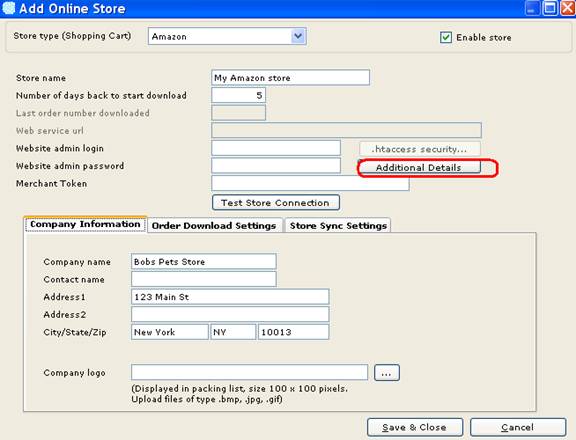
- Select Amazon as Store type (shopping cart) list.
Picture 5
- Enter the number to days back to start order download from. This is with respect to current date. If you enter 5, the system will download orders placed 5 days ago until the latest order. Do not enter more than 30 days.
- It is NOT necessary to enter admin login, password and merchant token so leave them blank
- Click on Additional details button
 Picture 6
|
|
|

Picture 6a
- Enter the values collected in Table 1. Note the tags here corresponding to the values in Table 1. It is STRONGLY RECOMMENDED to copy (select value and click Control C) and Paste (Control V) the values from your table to this screen. Any difference in a field value will prevent T-HUB to communicate with your Amazon account. Refer Picture 6a for reference showing what value from Amazon goes to which field in T-HUB.

Picture 6b
- Check the check box above to enable download of merchant fulfilled (MFN) orders.
- Set the Download Method to "Tab Delimited Order Report".
- Set Download Start date to a date within last 25 days in format (MM-dd-YYYY) E.g. 01-25-2013. Note that this date should be within the last 25 days otherwise Amazon will NOT return orders.
- If you want to view Pending orders from Amazon, check the download pending orders check box. Note pending orders cannot be shipped or sent to QuickBooks. It can be used to update reduced stock in websites from QuickBooks.
- Default Amazon fee - set this to 0% - recommended. You can set this to say 15% if ALL your items on Amazon carry a 15% fee and you want to quickly see this in T-HUB.

Picture 6c
- Check the check box to download Amazon fulfilled orders (FBA orders fulfilled by Amazon). Check this if you use the Fulfilled by Amazon (FBA) service and want T-HUB to bring in Amazon fulfilled orders. FBA Orders can only be sent to QuickBooks and they cannot be shipped from T-HUB as these orders are fulfilled by Amazon.
- If you use the Fulfilled by Amazon (FBA) service and want T-HUB to bring in Amazon fulfilled orders then set the date to use as the download start date for FBA. Set this to a date within last 25 days in format (MM-dd-YYYY) E.g. 01-25-2013. Note that this date should be within the last 25 days otherwise Amazon will NOT return orders
- Keep the Inventory latency days to value of 1. It is applicable only when updating inventory to Amazon. It has no effect on Order download.
- Click Close button.
- Click Save & Close to close the add online store form.
Settings for recording Amazon Fee in QuickBooks financial
(Note this feature is not available for QuickBooks POS)
T-HUB can download settlement reports from Amazon and post all expenses to QuickBooks. For this to work the your amazon account should be enabled to receive Settlement Report Flat File V2.
Please see a detailed video on how to manage Amazon orders and settlement report with QuickBooks
![]()
![]()
![]()
http://www.youtube.com/watch?v=5lrsCK6uBJ8&feature=share&list=UU7g8KYz61Bb1IgE6XHShjyQ
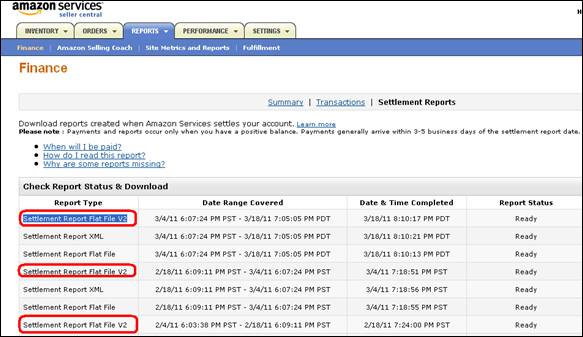
Login to Amazon seller central, Click on Reports > Finance > Settlement Reports > make sure you see Settlement Report Flat File V2 under report type as shown below. This report is used by T-HUB. If you do NOT see this report, contact your amazon account manager to enable this report for your account.
Picture 7
T-HUB can record Amazon expenses into QuickBooks as Check transaction. One check transaction per settlement report. In this case when T-HUB downloads settlement report from Amazon, it will record ONE check in QuickBooks). To set this option:
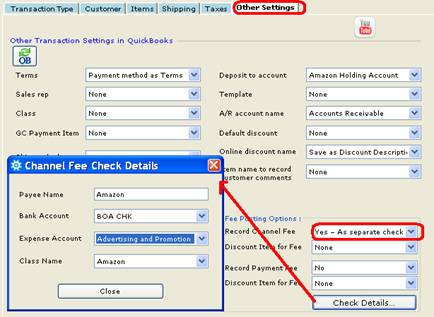
- Click on Store Preferences > QuickBooks Settings > Other Settings.
- Set Record channel fee as “Yes – as separate Single Check”
Picture 8
- Click on Check details button to enter settings for posting fee checks to QuickBooks.
· Payee Name : Name of an existing customer or vendor in QuickBooks.
· Bank Account : From which to withdraw the fee checks from
· Expense account : Name of expense type account to record fee
· Class Name: Optional class name to track expenses by class
Picture 9
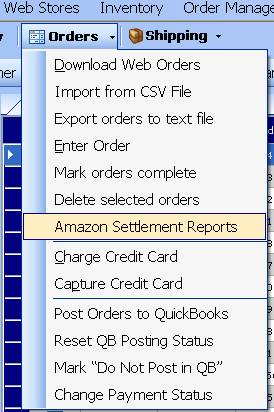
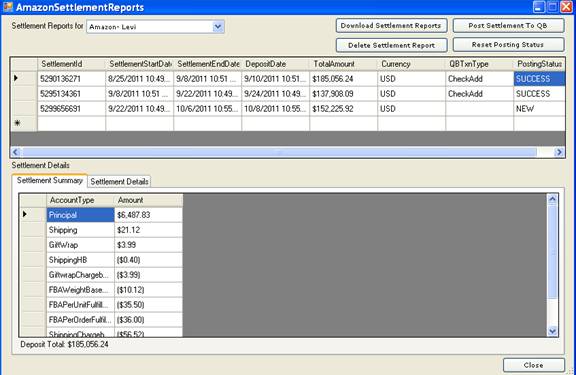
You will see the settlement reports interface as below. You can download settlement reports from here and select one report and click Post settlement to QB.
Enter a date (MM/DD/YYYY) and click on "Download Settlement Reports" to download settlement reports from Amazon.
Picture 10 a
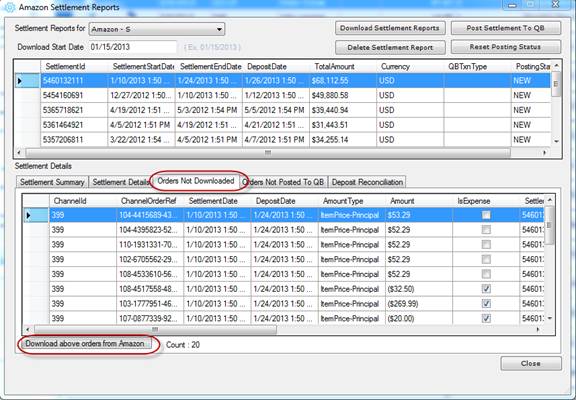
See the Orders Not Downloaded tab above. If you see any orders on this tab, it means these orders are there in the settlement report from Amazon but not downloaded into T-HUB. Click the button "Download above orders from Amazon".
 Picture 10 b
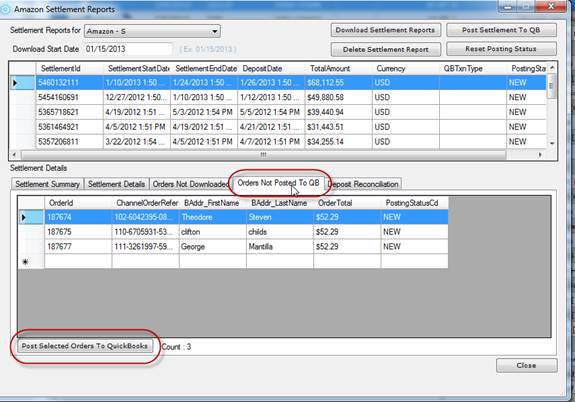
See the Orders Not Posted to QB tab above. If you see any orders on this tab, it means these orders are there in the settlement report from Amazon but not posted to QuickBooks. Click the button "Post selected orders to QuickBooks"
When you select a settlement report and click on Post Settlement to QB, the Posting status will change to SUCCESS as below.
Picture 11
If you double click on the SUCCESS posting status then the Check transaction will open up from QuickBooks for review as below. Note that the Sub accounts for each expense line is automatically created by T-HUB.

Picture 12
Updating Inventory on Amazon
T-HUB can update inventory stock quantity on Amazon from QuickBooks or QuickBooks Point of Sale.
See a brief video of updating inventory on Amazon from QuickBooks
![]()
![]()
![]()

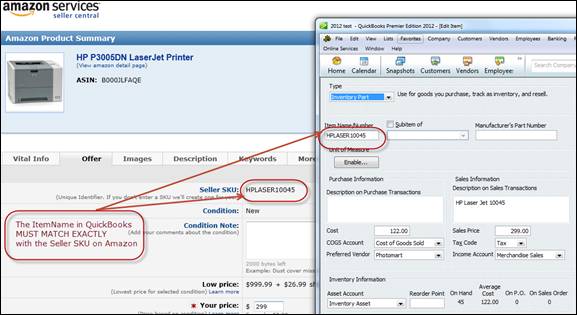
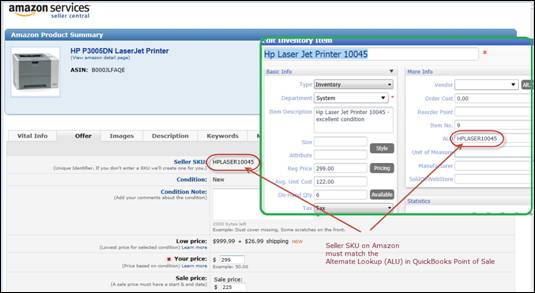
If you are using QuickBooks Financial (Pro/Premier/Enterprise) then the ItemName in QuickBooks should match the Seller SKU on Amazon (See below)
If you are using QuickBooks Point of Sale then the Alternate Lookup (ALU) in QuickBooks POS should match the Seller SKU on Amazon (See below). This is assuming that you have set the option in T-HUB to match products in QBPOS with ALU. If you set the option in T-HUB to match products in POS with ItemNumber (instead of ALU) then the ItemNumber in QBPOS must match the Seller SKU on Amazon.
To update inventory on Amazon, you first need to download product list from Amazon into T-HUB. This is done so that T-HUB has a list of products to send to Amazon. So if Amazon has 100 products for your account and you have 5000 products in your QuickBooks, T-HUB will be sending updates for only the matching 100 products to Amazon.
Open the Product upload and setup screen in T-HUB by clicking on the Product upload and sync to website icon.

Click on the Download products button and also click on Download FBA products button. This will send requests to Amazon to send a list of listed products on your amazon account. Please note that Amazon will take upto 3o minutes to generate these reports. Keep clicking on Download products buttons every couple of minutes to see if the report is ready. You will see the status change from Submitted to Ready. When you see the status change to Ready, click on the download products button one more time, this will start the download products and you will see the count of products increase. You can see list of products downloaded by clicking on the show button. This process of downloading products from Amazon is not required to be done manually here, T-HUB will automatically download products from Amazon during the automated inventory update process. This flow is described for your better understanding of how the process works.
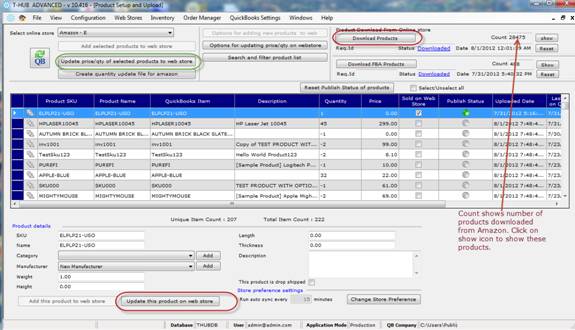
Once the product download is completed, you can select one product from list and click on Update this product on web store. If this product has a matching product on Amazon then T-HUB will send stock update to Amazon and the publish status will turn green. If there is no matching product (as checked against product list downloaded from Amazon) then the publish status will turn red and T-HUB will not send updates for these products to Amazon.
To publish multiple products from list, select one or more products by using shift click. Once you have multiple products selected, click on the button highlighted in green color. You will see a prompt question as below asking you whether you want to retrieve current inventory numbers from QuickBooks before sending to Amazon.

To Automate the inventory update process, you have to enable the T-HUB Automator. Refer to the main user guide on Automating T-HUB.